Workflows
Workflows let you chain agents, tools, and control logic into repeatable automations. They come in two flavours: background (autonomous, trigger-driven) and chat (interactive, human-in-the-loop).
Creating Your First Workflow
- Click the ⚙ gear icon next to Workflows in the sidebar, then click New Workflow.
- Give it a name (e.g.
user/daily-digest) and pick a mode — Background or Chat. - Add a trigger — what kicks the workflow off (schedule, event, or manual).
- Add steps — the work the workflow actually does.
- Save and launch it. Background workflows are launched from the definitions view (click the Launch button). Chat workflows are launched from the Chat view using the workflow button in the composer toolbar.
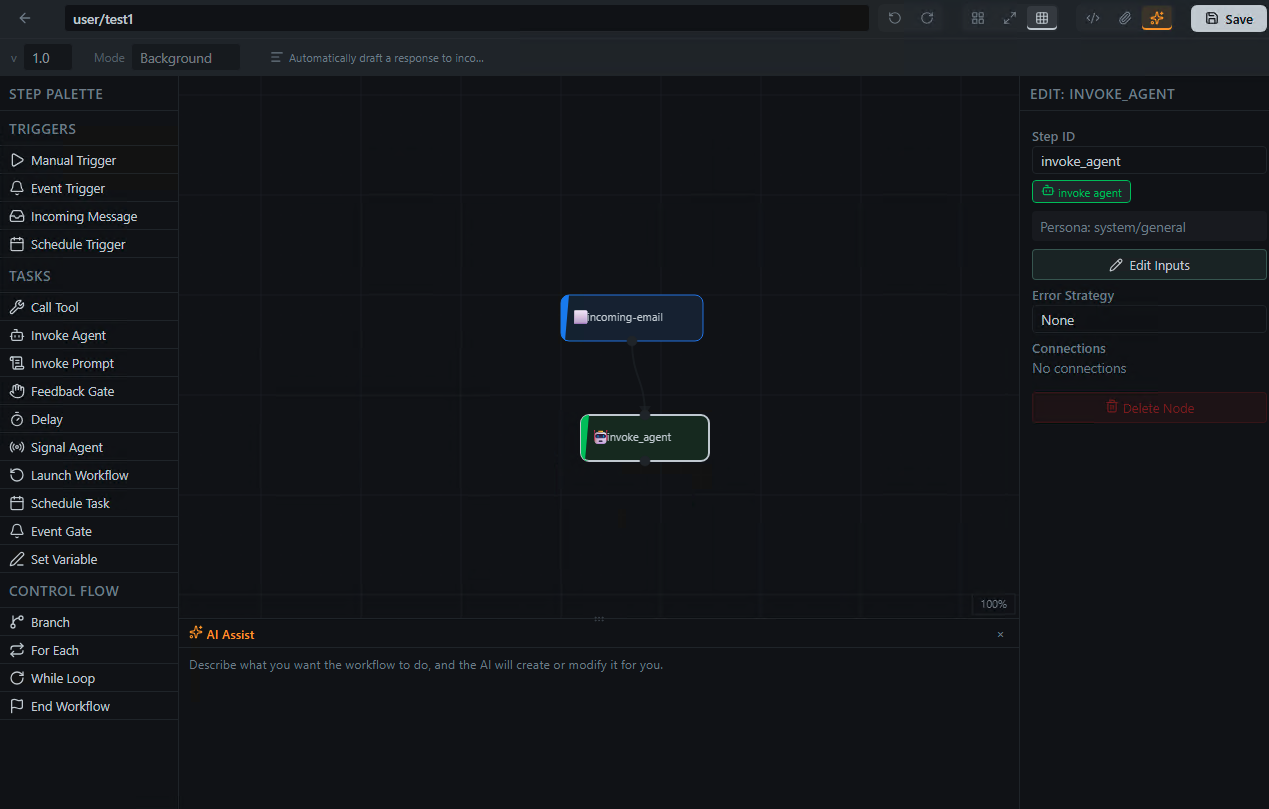
Visual Designer vs YAML Editor
HiveMind OS gives you three ways to build workflows:
- Visual designer — drag-and-drop step nodes onto a canvas and connect them. Great for exploring what's possible.
- YAML editor — write the workflow definition directly. Faster for power users and easy to version-control.
- AI generation — describe what you want in natural language and let HiveMind OS generate the YAML for you.
TIP
Start in the visual designer to learn the step types, then switch to YAML once you're comfortable — the two stay in sync automatically.
Background Workflows
Background workflows run autonomously without user interaction. They're ideal for automations that should just happen.
Triggers
| Trigger | Description |
|---|---|
manual | Triggered manually by a user (optionally with an input schema) |
schedule | Cron expression (e.g. "0 9 * * 1-5" for weekdays at 9 AM) |
event_pattern | Fires on internal event bus topics |
incoming_message | Fires on messages from a connector (email, Slack, Discord, etc.) |
Monitoring
Every run creates an instance visible on the Workflows page. From there you can inspect status, step-by-step logs, and output values in real time.
Example: Daily Standup Summary
name: user/daily-standup
mode: background
steps:
  - id: trigger
    type: trigger
    trigger:
      type: schedule
      cron: "0 9 * * 1-5"
  - id: gather
    type: task
    task:
      kind: invoke_agent
      persona_id: user/project-manager
      task: "Summarize yesterday's git commits and open PRs for the team"
    outputs:
      summary: "{{result}}"
  - id: notify
    type: task
    task:
      kind: call_tool
      tool_id: comm.send_external_message
      arguments:
        channel: "#standup"
        body: "{{steps.gather.outputs.summary}}"
More ideas: automated code scanning, nightly report generation, data pipeline orchestration.
Chat Workflows
Chat workflows run inside a conversation. They can pause to ask questions, present choices, and wait for approval before continuing.
Key Capabilities
- Feedback gates — pause execution and ask the user to confirm or choose.
- Interactive data gathering — collect inputs step-by-step through the chat.
- Result messages — display a formatted summary when the workflow completes.
Example: Guided Project Setup
name: user/project-setup
mode: chat
steps:
  - id: trigger
    type: trigger
    trigger:
      type: manual
      input_schema:
        type: object
        properties:
          projectName:
            type: string
  - id: ask_stack
    type: task
    task:
      kind: invoke_agent
      persona_id: user/developer
      task: "What tech stack should we use for {{trigger.input.projectName}}?"
  - id: confirm
    type: task
    task:
      kind: feedback_gate
      prompt: "Here's my recommendation. Shall I proceed?"
  - id: setup
    type: task
    task:
      kind: invoke_agent
      persona_id: user/developer
      task: "Set up project {{trigger.input.projectName}} with the agreed stack"
    outputs:
      result: "{{result}}"
result_message: "{{steps.setup.outputs.result}}"
Step Types Reference
Every step has a type (trigger, task, or control_flow) and a kind that determines what it does.
Task Kinds
| Kind | What it does |
|---|---|
call_tool | Invoke any MCP tool by tool_id with arguments |
invoke_agent | Spawn an agent with a persona and a task prompt |
invoke_prompt | Resolve a persona's prompt template with parameters |
feedback_gate | Pause and ask the user for confirmation or input (chat mode) |
event_gate | Pause until a specific event arrives on a topic |
launch_workflow | Start another workflow, optionally passing inputs |
schedule_task | Register a cron-scheduled action |
delay | Wait for duration_secs before continuing |
set_variable | Assign, append, or merge values into workflow variables |
signal_agent | Send a message to a running agent or session |
Control Flow
Use type: control_flow steps to add branching and iteration.
Branch
- id: check_size
  type: control_flow
  control:
    kind: branch
    condition: "{{steps.analyze.outputs.lines}} > 500"
    then: [deep_review]
    else: [quick_review]
For Each
- id: process_files
  type: control_flow
  control:
    kind: for_each
    collection: "{{steps.list.outputs.files}}"
    item_var: current_file
    body: [lint_file]
While
- id: poll
  type: control_flow
  control:
    kind: while
    condition: "{{variables.status}} != 'ready'"
    max_iterations: 10
    body: [check_status, wait]
Error Handling
Attach an on_error strategy to any step:
| Strategy | Behaviour |
|---|---|
retry | Retry up to max_retries times with delay_secs between attempts |
skip | Skip the step and optionally provide a default_output |
goto | Jump to a specific step_id |
fail_workflow | Abort the workflow with an optional message |
- id: flaky_api
  type: task
  task:
    kind: call_tool
    tool_id: fetch_data
    arguments:
      url: "https://api.example.com/data"
  on_error:
    strategy: retry
    max_retries: 3
    delay_secs: 10
Variables and Data Flow
Workflows pass data between steps using template expressions.
{{steps.<id>.outputs.<field>}}— a named output from a completed step.{{trigger.input.<field>}}— an input value from the trigger (manual triggers).{{trigger.<field>}}— trigger data (e.g.,{{trigger.from}},{{trigger.body}}for incoming messages).{{variables.<name>}}— a workflow-scoped variable set byset_variablesteps.
Use a set_variable step to accumulate or transform data mid-workflow:
- id: save_result
  type: task
  task:
    kind: set_variable
    assignments:
      - variable: summary
        value: "{{steps.gather.outputs.summary}}"
        operation: set
The operation field supports set (overwrite), append_list (add to an array), and merge_map (shallow-merge into an object).
TIP
Keep workflows focused on orchestration. Put complex logic inside agent prompts or dedicated tools — workflows are the glue that connects them.
Launching Workflows
Background and chat workflows are launched from different places in the UI.
Launching Background Workflows
Background workflows are launched from the workflow definitions view (⚙ gear icon next to Workflows in the sidebar):
- Open the definitions view and find your workflow
- Click the Launch button on the workflow definition
- If the workflow has multiple manual triggers, pick which one to use
- Fill in any required inputs (shown as a form generated from the
input_schema, or as a JSON editor for complex inputs) - Review and click Launch — the workflow starts immediately
The running instance appears on the Workflows page (click Workflows in the sidebar) where you can track its progress in real time.
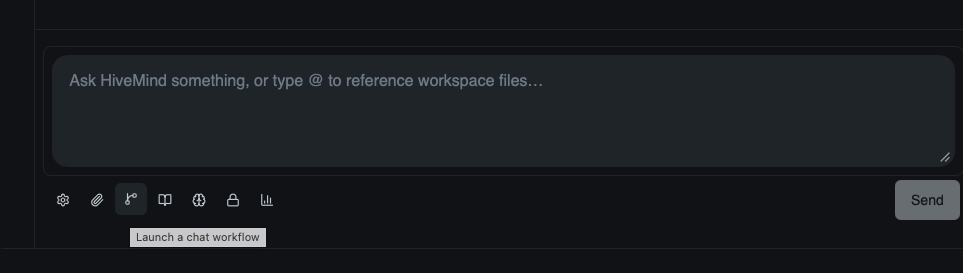
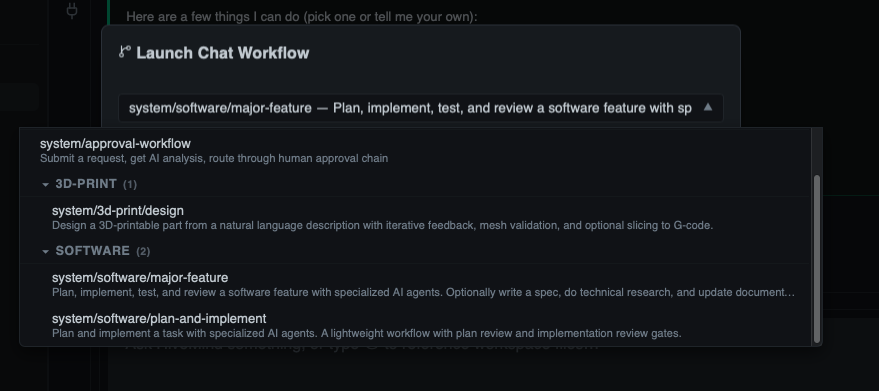
Launching Chat Workflows
Chat workflows are launched from the Chat view using the workflow button in the message composer:
- Open the Chat view and start or select a conversation
- Click the Launch a chat workflow button in the composer toolbar
- A dialog opens with a searchable list of available chat workflows — pick the one you want
- If the workflow has multiple manual triggers, choose which one to use
- Fill in any required inputs and click Launch
- The workflow attaches to your conversation — agent steps produce messages in the thread, and
feedback_gatesteps pause to present you with choices or a text input - Your responses feed back into the workflow, and execution continues
This makes chat workflows ideal for guided processes — onboarding, approval flows, interactive research — where you need to participate at key moments.
Automatic Triggers
Workflows with non-manual triggers activate automatically once saved:
| Trigger | When it fires |
|---|---|
schedule | At the next matching cron time (e.g., "0 9 * * 1-5" fires weekdays at 9 AM) |
event_pattern | When a matching event is published on the internal event bus |
incoming_message | When a message arrives on the specified connector channel |
You can pause triggers on any workflow without deleting it — the workflow stays saved but won't fire until you resume triggers. Toggle this from the workflow's detail panel.
Launching from Within a Workflow
Use the launch_workflow step kind to start one workflow from another:
- id: run_subreport
  type: task
  task:
    kind: launch_workflow
    workflow_name: user/generate-report
    inputs:
      date_range: "{{variables.date_range}}"
This is how you compose small, focused workflows into larger automations — each workflow handles one concern.
Managing Running Workflows
Every workflow launch creates an instance — a running copy of the workflow definition with its own state, variables, and progress.
Monitoring
Open the Workflows page to see all active and completed instances:
- Status — Running, Paused, Waiting (at a gate), Completed, or Failed
- Step progress — see which step is currently executing and review outputs from completed steps
- Live updates — the page updates in real time as steps complete
Flight Deck
For a global view of all running workflows and agents in one place, open the Flight Deck — click the 🚀 rocket button in the top-right corner. See the No-Code Guide for details.
Responding to Gates
When a running workflow reaches a feedback_gate, it pauses and waits for your input. In chat workflows, the gate appears as a message in your conversation. For background workflows, the gate surfaces on the Workflows page as a pending action.
When a workflow hits an event_gate, it waits for the specified event. If you configured a timeout and it expires, the step completes with a timeout payload (error: "event_gate_timeout") — you can branch on this in a subsequent step to handle the timeout gracefully.
Pause, Resume, and Kill
From the workflow instance detail panel:
- Pause — temporarily suspend execution. The workflow keeps its state and can be resumed later.
- Resume — continue a paused workflow from where it left off.
- Kill — immediately terminate the workflow. This cannot be undone.
Archiving
Completed or failed instances can be archived to keep your Workflows page clean. Archived instances are hidden from the default view but can still be reviewed.
Bundled Workflows
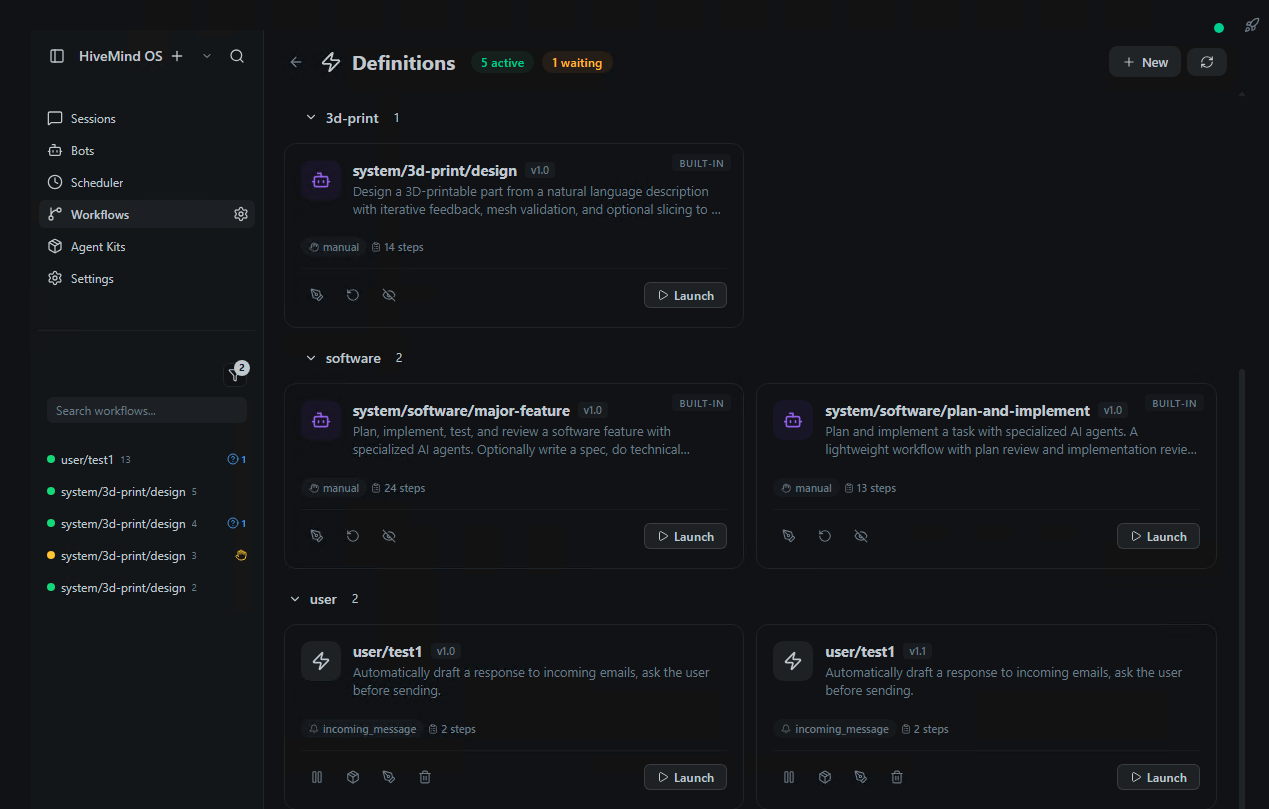
HiveMind OS ships with several ready-to-use workflows. You can launch them directly, or copy and customize them to fit your needs.
Browsing Bundled Workflows
Click the ⚙ gear icon next to Workflows in the sidebar to open the definitions view — bundled workflows appear alongside your custom workflows with a system/ prefix. Click any workflow to view its definition, then:
- Launch — run it immediately with the default or your own inputs
- Copy — create a new workflow using New Workflow → Copy from existing to get an editable copy under your
user/namespace
Available Bundled Workflows
| Workflow | ID | Mode | What it does |
|---|---|---|---|
| Approval Workflow | system/approval-workflow | Chat | Submit a request with a title, description, and urgency. An AI agent analyzes it, then a feedback gate lets you approve, request changes, or reject. Demonstrates branching based on user decisions. |
| Email Responder | system/email-responder | Background | Auto-replies to incoming customer emails using a support agent persona with access to uploaded product documentation. |
| Email Triage | system/email-triage | Background | Classifies and routes incoming emails by intent — product questions, bug reports, billing issues — and takes appropriate action for each category. |
| Plan and Implement | system/software/plan-and-implement | Chat | A two-phase workflow: first an AI agent creates a plan, then (after your approval via a feedback gate) another agent implements it. Includes a review loop. |
| Software Feature | system/software/major-feature | Chat | Full software development lifecycle — optional spec writing, technical research/POC, planning, implementation, and documentation. Each phase has a feedback gate for human review, with while loops that let you request revisions. |
| 3D Print Design | system/3d-print/design | Chat | Guides a 3D print CAD design workflow using specialized personas for modeling and analysis. |
Start with Approval Workflow
The Approval Workflow is the simplest bundled workflow and a great way to see feedback gates, branching, and variables in action. Launch it from the definitions view to try it out.
Creating a Custom Workflow from Scratch
This walkthrough takes you from an idea to a running workflow. We'll build a support ticket triage workflow that classifies incoming messages and routes them to the right team.
Step 1: Define Your Use Case
Before opening the editor, decide:
- What triggers the workflow? → An incoming message on the support channel
- What should happen? → Classify the message, then route it
- Does a human need to be involved? → Not for classification, but yes for edge cases
- Background or chat? → Background — this should run automatically
Step 2: Create the Workflow
- Open the workflow definitions view (⚙ gear icon next to Workflows in the sidebar) and click New Workflow
- Name it
user/support-triage - Set mode to Background
Step 3: Add the Trigger
Start with the incoming message trigger:
name: user/support-triage
mode: background

steps:
  - id: trigger
    type: trigger
    trigger:
      type: incoming_message
      channel_id: support-inbox
      ignore_replies: true
    next: [classify]
Step 4: Add Classification
Use an invoke_agent step to classify the message. Note how trigger data for incoming messages is accessed directly as {{trigger.from}}, {{trigger.subject}}, {{trigger.body}}, etc.
  - id: classify
    type: task
    task:
      kind: invoke_agent
      persona_id: user/support-classifier
      task: |
        Classify this support message into one category:
        - bug_report
        - feature_request
        - billing
        - general_question

        From: {{trigger.from}}
        Subject: {{trigger.subject}}
        Body: {{trigger.body}}

        Return a JSON object with:
        - "category": one of the above categories
      timeout_secs: 60
    outputs:
      category: "{{result.category}}"
    on_error:
      strategy: skip
      default_output:
        category: "general_question"
    next: [route]
Step 5: Add Routing with Branches
Use a branch step to handle each category differently:
  - id: route
    type: control_flow
    control:
      kind: branch
      condition: "{{steps.classify.outputs.category}} == billing"
      then: [forward_to_billing]
      else: [auto_respond]
Step 6: Add the Action Steps
  - id: forward_to_billing
    type: task
    task:
      kind: call_tool
      tool_id: connector.send_message
      arguments:
        channel_id: billing-team
        to: "{{trigger.from}}"
        subject: "Billing inquiry: {{trigger.subject}}"
        body: "Forwarded billing inquiry from {{trigger.from}}:\n\n{{trigger.body}}"
    next: [end]

  - id: auto_respond
    type: task
    task:
      kind: invoke_agent
      persona_id: user/support-agent
      task: |
        Reply to this {{steps.classify.outputs.category}} message:
        From: {{trigger.from}}
        Subject: {{trigger.subject}}
        Body: {{trigger.body}}

        Write a helpful response. Return ONLY the reply text.
      timeout_secs: 120
    outputs:
      reply: "{{result}}"
    next: [send_reply]

  - id: send_reply
    type: task
    task:
      kind: call_tool
      tool_id: connector.send_message
      arguments:
        channel_id: support-inbox
        to: "{{trigger.from}}"
        subject: "Re: {{trigger.subject}}"
        body: "{{steps.auto_respond.outputs.reply}}"
    on_error:
      strategy: retry
      max_retries: 3
      delay_secs: 5
    next: [end]

  - id: end
    type: control_flow
    control:
      kind: end_workflow
Step 7: Test It
Add test cases to your workflow definition to validate behaviour without any real side effects:
tests:
  - name: billing_route
    description: "Billing messages go to the billing team"
    inputs:
      from: "test@example.com"
      subject: "Invoice help"
      body: "I need an invoice copy"
    shadow_outputs:
      classify:
        category: "billing"
    expectations:
      status: completed
      steps_completed: [classify, forward_to_billing]
      steps_not_reached: [auto_respond]

  - name: general_question_route
    inputs:
      from: "user@example.com"
      subject: "Password reset"
      body: "How do I reset my password?"
    shadow_outputs:
      classify:
        category: "general_question"
    expectations:
      status: completed
      steps_completed: [classify, auto_respond, send_reply]
Open the Tests panel in the workflow designer and click Run Tests. Each test runs in shadow mode — no real emails are sent. See Testing Your Workflows below for the full details.
Step 8: Activate
Once you're happy with the results, the workflow will automatically fire on new incoming messages on the support-inbox channel. You can pause triggers at any time without deleting the workflow.
Iterate with AI Assist
Use the AI Assist panel in the workflow editor to refine your workflow. Describe what you want to change in natural language — "add a feedback gate before sending billing inquiries" — and HiveMind OS will update the YAML for you.
Testing Your Workflows
Workflows that send emails, invoke agents, or call external APIs can be expensive to run incorrectly — thousands of emails sent, LLM tokens burned, or production data modified by accident. The built-in test runner lets you validate workflow behaviour safely using shadow mode, where side effects are intercepted rather than executed.
Writing Test Cases
Test cases live in the workflow YAML under the tests key. Each test case simulates a trigger event and asserts on the outcome.
tests:
  - name: happy_path
    description: "Full pipeline runs to completion"
    inputs:
      from: "customer@example.com"
      subject: "Help"
      body: "I need help with my account"
    expectations:
      status: completed
      steps_completed: [classify, auto_respond, send_reply]
You can write tests in the visual designer's Tests panel or directly in the YAML editor.
Mocking Steps with Shadow Outputs
Use shadow_outputs to provide a fixed output for specific steps, skipping their real execution. This makes tests fast and deterministic — ideal for isolating one part of the workflow:
tests:
  - name: test_billing_branch
    inputs:
      from: "test@example.com"
      subject: "Billing"
      body: "Invoice question"
    shadow_outputs:
      classify:
        category: "billing"
    expectations:
      status: completed
      steps_completed: [classify, forward_to_billing]
      steps_not_reached: [auto_respond]
In this example, the classify step is stubbed to always return "billing", so you can test that the branch routes correctly without waiting for an LLM response.
Asserting Agent Tool Calls
When an agent step runs (not mocked), shadow mode intercepts its tool calls. Use expected_tool_calls to assert the agent called the right tools:
tests:
  - name: agent_drafts_reply
    inputs:
      from: "customer@example.com"
      subject: "Help"
      body: "Account question"
    expected_tool_calls:
      auto_respond:
        - tool_id: comm.send_external_message
          arguments:
            to: "customer@example.com"
    expectations:
      status: completed
Arguments are partially matched — only the keys you specify are checked, so the agent can include additional parameters.
WARNING
You cannot use expected_tool_calls and shadow_outputs on the same step. A mocked step produces no intercepted actions.
Running Tests
- Open your workflow in the designer
- Click the Tests tab in the right panel
- Click Run Tests (or select individual tests to run)
- Watch progress — each test shows a live status badge (⏳ running → ✅ passed / ❌ failed)
- Click a completed test to see the Test Result Details dialog
The result dialog has three tabs:
| Tab | What it shows |
|---|---|
| Steps | Every step with its final status and output |
| Output | The workflow's final output value |
| Actions | All intercepted actions — tool calls (🔧), ask_user questions (💬), and tool approvals (🔐) — with full details |
Stopping a Test Run
Click the red Stop button in the Tests panel to cancel the current run. The currently executing test will finish, but remaining tests are skipped. The results show which tests ran and which were cancelled.
What Gets Intercepted
In shadow mode, the test runner intercepts and records:
| Action | What happens |
|---|---|
| Side-effecting tool calls | Intercepted — recorded with tool ID and arguments |
| Read-only tool calls | Execute normally — the workflow gets real data |
Agent ask_user calls | Auto-answered (first choice or "proceed" for freeform) and recorded |
| Tool approval requests | Auto-approved and recorded |
launch_workflow | Intercepted — nested workflow is not actually launched |
schedule_task | Intercepted — no task is actually scheduled |
signal_agent | Intercepted — no message is actually sent |
This means your tests exercise the full workflow logic — conditions, branches, loops, variable assignments — while ensuring nothing escapes into the real world.
Test Writing Tips
Start with shadow_outputs
When starting a new workflow, mock every agent step with shadow_outputs first. This lets you test control flow, branching, and variable passing without any LLM calls. Then remove mocks one step at a time to validate agent behaviour.
One test per branch
Write a separate test for each branch path. Use shadow_outputs to force the condition that activates each branch, then assert with steps_completed and steps_not_reached that the right path was taken.
Use intercepted_action_counts for safety checks
Add intercepted_action_counts to catch unexpected side effects:
expectations:
  intercepted_action_counts:
    tool_calls: 1
    total: 1
This ensures your workflow isn't accidentally calling more tools than expected.
For more on the testing concepts, see Workflows Concept → Testing & Shadow Mode.
Next Steps
- Workflows Concept — Architecture and data flow model
- Email Support Workflow — Full end-to-end email automation example
- Onboarding Chat Workflow — Interactive chat workflow with feedback gates
- Daily Automation — Scheduled background workflow recipes
- Security Policies — Data classification and tool approval for workflow agents