No-Code Guide
Everything in HiveMind OS can be done from the desktop app — no terminal, no config files, no coding. This guide walks you through every feature using just the UI.
Whether you're a small business owner, a team lead, or someone who just wants AI to handle the boring stuff, this page is for you. We'll cover setup, providers, personas, connectors, workflows, bots, and chat — all from the app window.
New to the terminology?
Check the Glossary for plain-English definitions of terms like persona, workflow, connector, and more.
Getting Set Up
When you first open HiveMind OS, a Setup Wizard walks you through everything you need. It takes about five minutes. You'll connect an AI provider, optionally add email or chat connectors, enable web search, pick your default model, and get a quick tour of the app. You can skip any step and come back to it later in Settings. For a detailed walkthrough of first launch, see the Quickstart.
Adding AI Providers
Providers are the AI services that power your assistants. Go to Settings → Providers to add, edit, or remove them.
Each provider appears as a card. Click a card to configure it, or click Add Provider to set up a new one.
| Provider | What You Need | Best For |
|---|---|---|
| Anthropic | API key from console.anthropic.com | High-quality reasoning, writing, and analysis |
| OpenAI Compatible | API key and endpoint URL | Works with OpenAI, Groq, Together, and other compatible services |
| GitHub Copilot | Sign in with your GitHub account (OAuth) | If you already pay for GitHub Copilot |
| Azure AI Foundry | Azure subscription and endpoint | Enterprise deployments with Azure compliance |
| Ollama | Install Ollama on your machine (no key needed) | Free, private, runs entirely on your computer |
To add a provider, click its card, enter the required credentials, and click Save. HiveMind OS will test the connection automatically.
Which provider should I choose?
- Just want it to work? → Anthropic or OpenAI Compatible (needs an API key)
- Already use GitHub? → GitHub Copilot (sign in with your GitHub account)
- Want everything local? → Ollama (free, runs on your machine, no API key needed)
Creating Personas
Personas are the AI assistants you talk to. Each one has its own personality, instructions, and capabilities. Go to Settings → Personas and click New Persona.
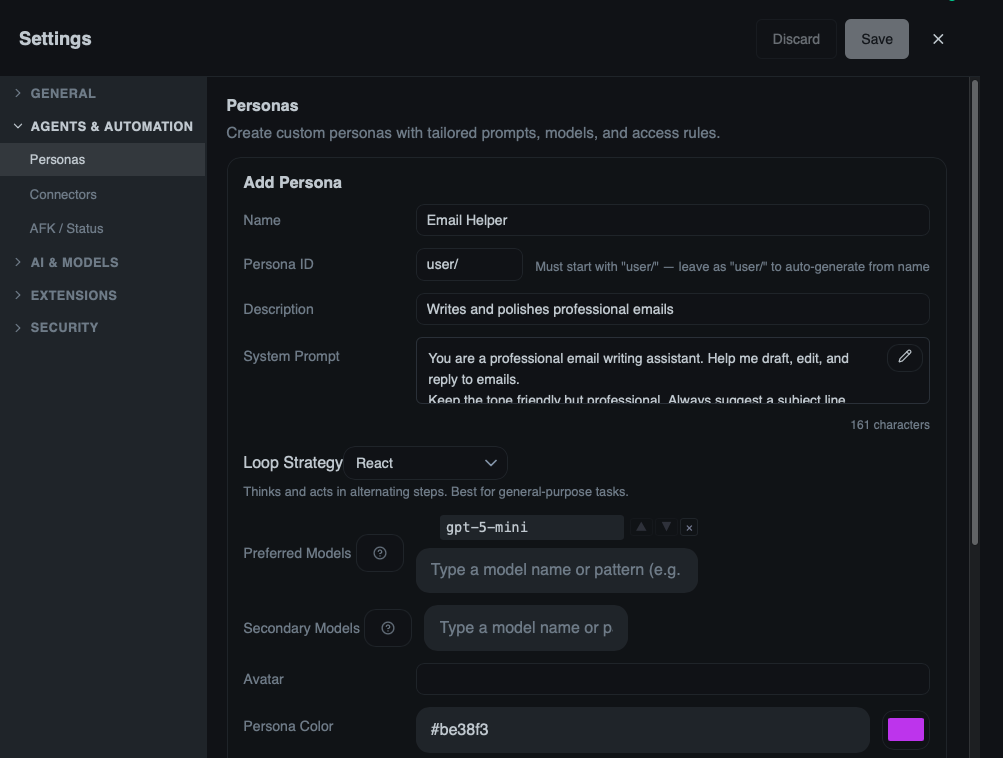
Here's what each field means:
Name — What you call this assistant. Pick something descriptive, like "Customer Support" or "Content Writer."
Description — A short note for yourself about what this persona does. Only you see this.
Avatar — Pick an emoji to represent this persona in the chat list.
Color — Choose a color for the chat bubble so you can tell personas apart at a glance.
System Prompt — This is the most important field. It tells the AI how to behave. Write it like you're briefing a new employee. For example:
You are a friendly customer support agent for Riverstone Coffee Co. Always be empathetic and patient. Check the product manual before answering any question about our products. If you don't know the answer, say so honestly and offer to escalate to a human.
Be specific. The more detail you put here, the better your assistant will perform.
Preferred Models — Which AI model this persona should use. Leave it blank to use your default model. If you have multiple providers, you can pick a specific model here.
Allowed Tools — Which tools (email, calendar, web search, etc.) this persona can access. Leave the defaults for most use cases. Restrict tools if you want a persona that only answers questions without taking actions.
Quick Persona Recipes
Here are three personas you can create in a few minutes:
Customer Support — Handles emails with empathy and product knowledge. Set the system prompt to describe your company, your tone of voice, and your most common questions. Add your product manual as a knowledge attachment. Allow email tools so it can draft replies.
Content Writer — Drafts blog posts and social media in your brand voice. In the system prompt, describe your brand personality, target audience, and any style rules (word count, tone, topics to avoid). Allow web search so it can research topics.
Research Assistant — Finds information and summarizes it clearly. Keep the system prompt simple: tell it to be thorough, cite sources, and present findings in plain language. Allow web search and file tools.
Connecting Email, Calendar, and Chat
Connectors let your AI read and send messages, check your calendar, and interact with your team's chat tools. Go to Settings → Connectors.
- Click Add Connector
- Choose your provider:
- Gmail — Sign in with Google (OAuth). Gives access to email, calendar, and contacts.
- Microsoft 365 — Sign in with your Microsoft account (OAuth). Covers Outlook email, calendar, and OneDrive.
- IMAP — Connect any email provider with server address, username, and password. Use this for custom or corporate email that isn't Gmail or Outlook.
- Slack — Authorize with your Slack workspace. Your AI can read and post messages in channels.
- Discord — Connect with a bot token. Useful for community management.
- Apple — Connect your Apple account for iCloud mail and calendar.
- Coinbase — Link your Coinbase account for crypto portfolio queries.
- Follow the authorization flow. For Gmail and Microsoft 365, this opens a browser window where you sign in and grant permission. For IMAP, you enter your credentials directly.
- Once connected, the connector appears in your list with a green status indicator. Your AI personas can now use it.
Start with email
Email is the most versatile connector. Once connected, you can auto-reply to customers, summarize your inbox, and trigger workflows from incoming messages.
Building Workflows (Visual Designer)
Workflows let you automate multi-step tasks. You build them in a visual designer with drag-and-drop steps, form-based configuration, and an AI assistant that can help design the workflow for you. Click the ⚙ gear icon next to Workflows in the sidebar to open the workflow definitions view.
The Creation Wizard
Click New Workflow to open the creation wizard.
It walks you through six steps:
Step 1 — Choose how to start:
- Start from scratch — Build a brand-new workflow from an empty canvas.
- Copy from existing — Duplicate one of your workflows (or a bundled system workflow) as a starting point. Pick the source workflow from the dropdown and give your copy a new name.
- Start from a template — Pick from a library of pre-built templates. Like "Copy from existing," this creates an editable copy you own.
Step 2 — Choose workflow type:
- Background — Runs automatically without your input. Great for automations like "summarize every new email" or "triage incoming support tickets."
- Chat — Interactive. The workflow runs inside a conversation in the Chat view so you can provide input, answer questions, and guide it along the way.
Step 3 — Name your workflow. Give it a clear, descriptive name.
Step 4 — Attachments (optional). Upload reference documents — product manuals, style guides, FAQ sheets — for the AI to consult during the workflow. You can also add these later in the designer.
Step 5 — Generate with AI (optional). Describe what you want the workflow to do in plain language and the AI assistant will design it for you. You can also choose whether the workflow should include human-approval steps, skip approvals, or let the AI decide. If you skip this step, you'll start with an empty canvas.
Step 6 — Choose a trigger. The trigger decides what starts your workflow:
| Trigger | What It Does | Configuration |
|---|---|---|
| Manual | You start it yourself by clicking Launch | Define input fields (name, type, label) that appear as a form when launching |
| Schedule | Runs on a timer | Set a cron expression (e.g., daily at 9 AM) |
| Incoming Message | Fires when a new email or chat message arrives | Pick a connector and optionally filter by channel, sender, subject, or body. For email, you can auto-mark as read and ignore replies |
| Event Pattern | Fires when a specific internal event occurs | Set an event topic and optional filter expression |
Chat workflows only support manual triggers
Since chat workflows run inside a conversation, they always start when you launch them — so the wizard only shows the Manual trigger for chat mode.
The Visual Designer
After the wizard, you land in the visual designer — a canvas-based editor where you build your workflow.
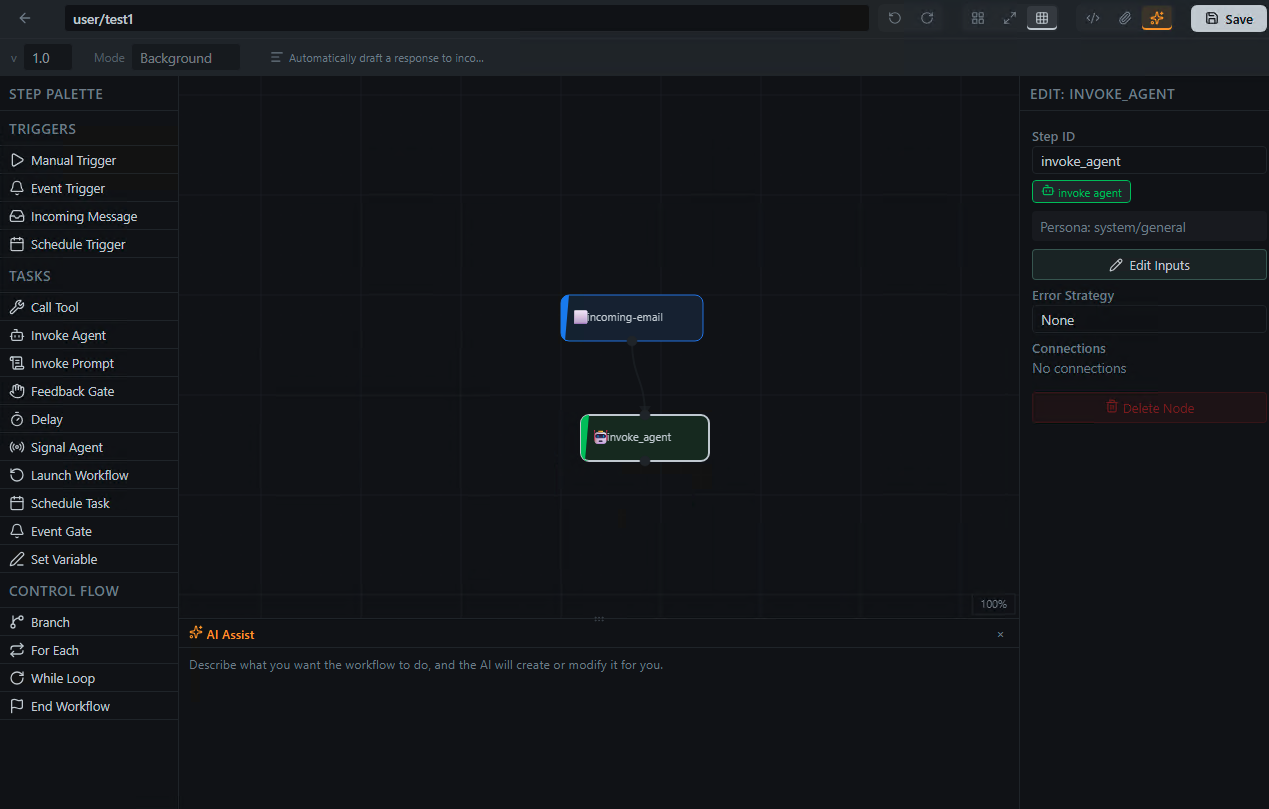
It has four main areas:
Step Palette (left side) — Lists all the step types you can add. Drag a step onto the canvas, or click it to add it to your workflow. The available steps are:
| Step | What It Does |
|---|---|
| Invoke Agent | Have one of your personas perform a task. E.g., "Read this email and draft a reply." |
| Invoke Prompt | Run a prompt template against a persona — useful for structured, repeatable tasks with parameters. |
| Call Tool | Perform a specific action: send an email, search the web, create a calendar event, etc. Pick from any tool your connectors provide. |
| Feedback Gate | Pause and ask you a question before continuing. Great for approvals ("Does this reply look good?"). You define the prompt, choices, and whether free-form input is allowed. |
| Event Gate | Pause and wait for an external event (e.g., a webhook or system event) before continuing. Set a topic, optional filter, and timeout. |
| Delay | Wait a set amount of time (days, hours, minutes, seconds) before moving on. |
| Set Variable | Store or update a value for use in later steps. Supports set, append to list, and merge into object. |
| Branch | Split the workflow into two paths based on a condition. |
| For Each | Loop over a collection and run steps for each item. |
| While Loop | Repeat steps as long as a condition is true, with a configurable max iterations safety limit. |
| Launch Workflow | Start another workflow from within this one. |
| Signal Agent | Send a signal to a running bot. |
| Schedule Task | Schedule a task for later execution. |
| End Workflow | Explicitly end the workflow at this point. |
Canvas (center) — The visual graph of your workflow. Steps appear as nodes connected by edges showing the flow. You can:
- Drag nodes to rearrange the layout
- Connect steps by dragging from one node's output port to another node's input port
- Select multiple nodes and move them together
- Auto-layout with
Ctrl+Shift+L(orCmd+Shift+Lon Mac) to tidy up the graph
Node Editor (right side) — When you click a step on the canvas, a panel opens on the right showing that step's configuration form. Each step type has its own fields — for example, an Invoke Agent step lets you pick a persona, write the task prompt, set a timeout, and configure permissions. A Call Tool step shows a tool picker and auto-generates input fields based on the tool's schema.
AI Assist (bottom) — A built-in chat panel where you can ask the AI to modify your workflow. Describe what you want in plain language — "add error handling to each step," "insert an approval gate before sending the email," "add a branch that routes billing questions differently" — and the AI will update the workflow graph for you. Quick-action buttons for common requests (like adding error handling or approval steps) are available as shortcuts.
YAML Preview
The designer also includes a YAML preview panel that shows the underlying workflow definition. This is read-only — all editing happens through the visual designer and node editor forms. The YAML view is useful for understanding the structure or for copying the definition to share with others.
Save and Activate
When you're happy with your workflow, save it and toggle it to active. It will start running based on its trigger.
Launching a Workflow
Background and chat workflows are launched from different places.
Background workflows — launch from the workflow definitions view:
- Click the ⚙ gear icon next to Workflows in the sidebar to open the definitions view
- Find your workflow and click Launch
- If the workflow has multiple manual triggers, pick which one to use
- Fill in any required inputs and click Launch
The running instance appears on the Workflows page (click Workflows in the sidebar) where you can track its progress.
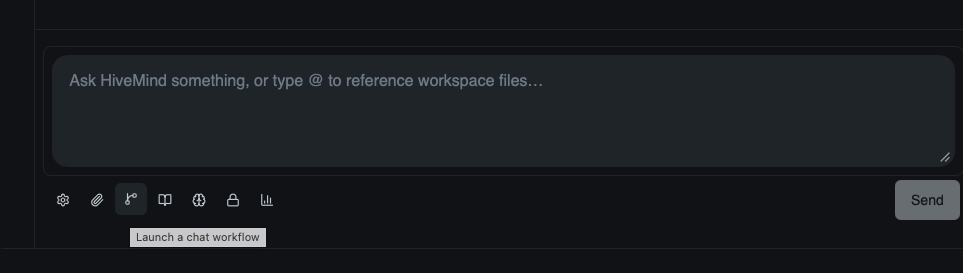
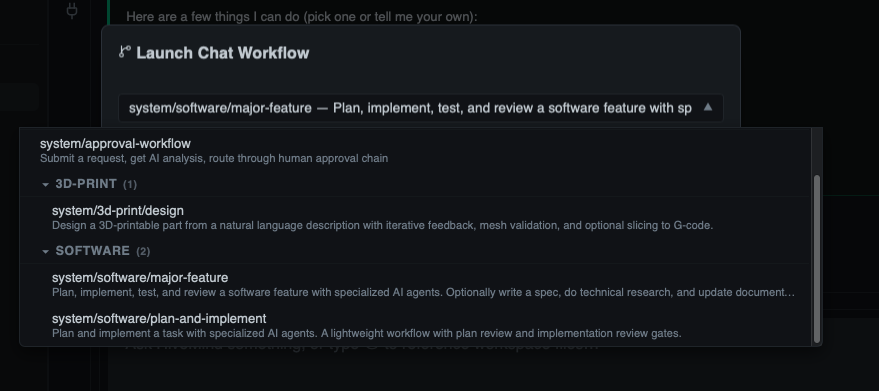
Chat workflows — launch from the Chat view:
- Open the Chat view and start or select a conversation
- Click the Launch a chat workflow button in the composer toolbar
- Pick your workflow from the searchable list that appears
- Fill in any required inputs and click Launch
- The workflow runs inside your conversation — it sends messages and can ask you questions along the way
Workflows with automatic triggers (schedule, incoming message) run on their own once saved — no need to launch them manually.
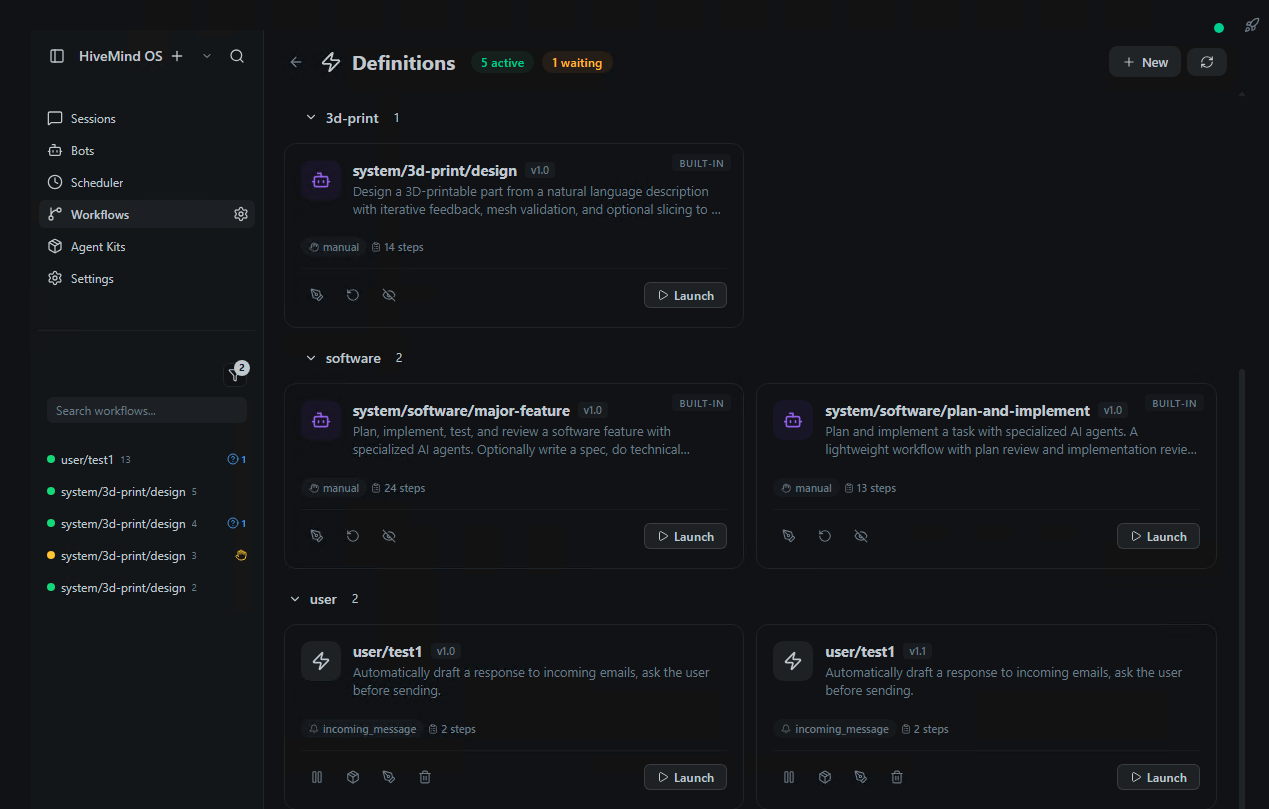
Try the Bundled Workflows
HiveMind OS comes with several pre-built workflows ready to use — no setup required. Open the workflow definitions view (⚙ gear icon next to Workflows in the sidebar) and look for the ones with a system/ prefix:
- Approval Workflow — submit a request, get an AI analysis, then approve or reject it. A great way to see how interactive workflows work.
- Email Responder — automatically replies to incoming customer emails using your uploaded product docs.
- Email Triage — classifies incoming emails by type (bug report, billing, feature request) and routes them.
- Software Feature — guides you through planning, implementing, and documenting a software feature with AI agents at each stage.
To customize a bundled workflow, use New Workflow → Copy from existing — this creates your own copy that you can edit freely.
Start simple
Your first workflow should have just three parts: a trigger, one agent step, and one action. You can always add more steps later. Or try launching one of the bundled workflows to see a complete example in action.
Launching Bots
Bots are persistent AI agents that work on tasks in the background. They're like employees you assign work to. Go to Bots in the sidebar.
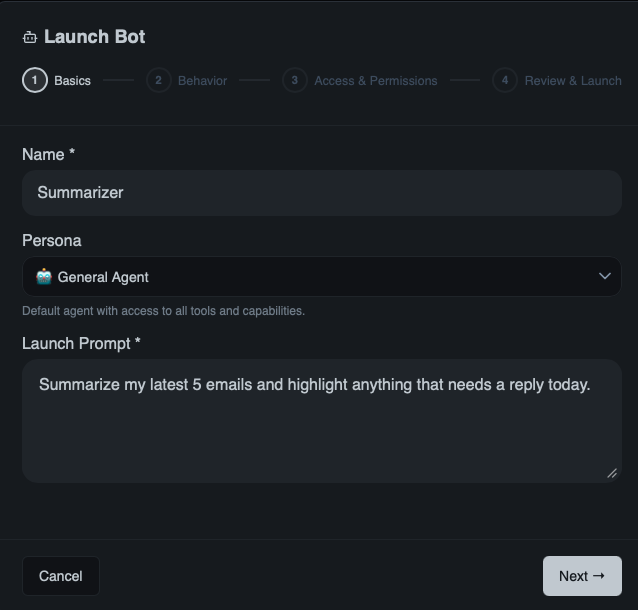
Create a Bot
Click New Bot
Pick a persona — this determines the bot's personality and capabilities
Write a launch prompt — describe the task in plain language. For example:
Research the top five competitors in the specialty coffee market. For each one, find their pricing, key products, and what customers say about them online. Summarize everything in a table.
Choose a mode:
Mode What It Does One-shot Does the task once, then stops. Use for one-off jobs. Idle after task Completes the task, then waits for you to give it more work. Continuous Keeps running and working on its own. Use for ongoing monitoring. Click Launch
Watching Your Bot Work
After launching, your bot appears in the Agent Stage — a live view where you can watch what it's doing, see its progress, and read its output. You can have multiple bots running at the same time.
Bots are great for both one-off tasks ("research competitors in my industry") and ongoing work ("monitor my inbox and flag urgent emails every morning").
Using Chat
The Chat view is where you have direct conversations with your AI personas.
- Pick a persona from the persona picker at the top of the chat. Each persona has its own conversation history.
- Type your message and press Enter. The AI responds using the persona's instructions and preferred model.
- Use
/prompt(or/p) to load a saved prompt template. This is handy for tasks you repeat often, like "summarize this article" or "draft a response to this email." - Tools happen automatically. If your persona has access to tools like web search, email, or file reading, it will use them when needed. You don't have to do anything special.
- Everything stays on your machine. Your conversations are stored locally, not in the cloud.
The Flight Deck
The Flight Deck is your mission control for everything that's currently running in HiveMind OS. Open it by clicking the rocket button (🚀) in the top-right corner of the app.
It gives you a global, real-time view of all active agents, workflows, and other system activity — so you always know what's happening and can step in when needed.
Agents tab
Shows every active agent (bots and workflow agents) with live status updates:
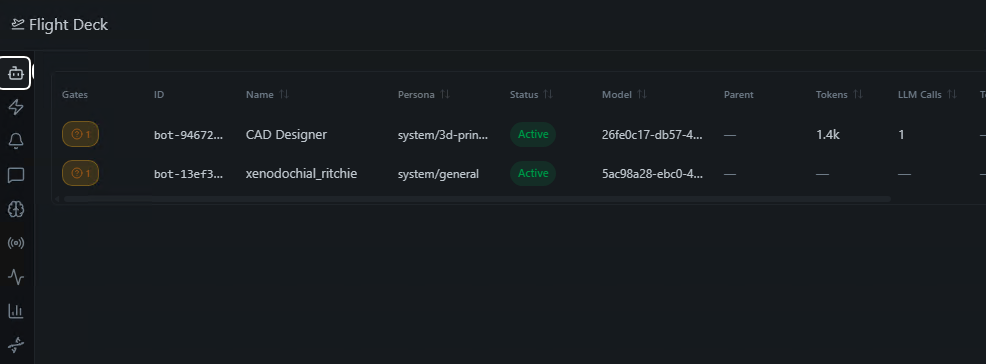
- Status indicators — see at a glance which agents are active, waiting, paused, or blocked
- Gate badges — approval and question badges appear when an agent needs your input. Click them to respond immediately
- Live metrics — token usage, LLM calls, tool calls, and runtime update in real time
- Actions — click any agent to pause, resume, reconfigure, restart, or stop it
Workflows tab
Shows all running and pending workflow instances:
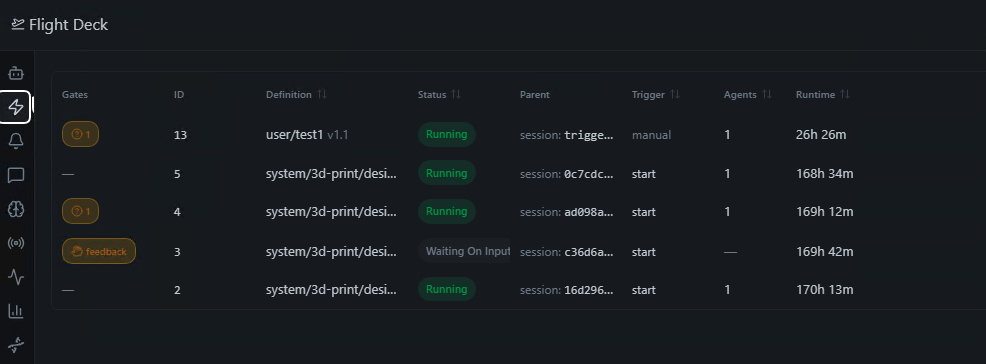
- Instance status — running, paused, pending, or waiting for input/event
- Step details — click a workflow to see its individual steps, variables, and output
- Gate badges — just like agents, workflows show approval and question badges when they need your attention
- Actions — pause, resume, or stop any workflow instance
Other tabs
The Flight Deck also includes tabs for:
- Triggers — active triggers listening for events (schedules, incoming messages, etc.)
- Sessions — open chat sessions and their status
- Models — which AI models are loaded and available
- Events — a live stream of system events
- Services — background services and their health
- Health — overall system status
- Knowledge — the knowledge graph and stored memories
What's Next?
Now that you know your way around the app, explore these resources to go deeper:
- Use Cases — Ready-made automations for common business tasks
- Personas Guide — Deep dive into creating effective AI assistants
- Workflows Guide — Advanced workflow features and patterns
- Privacy & Security — How your data stays safe